ClientVault Developer Guide
Acknowledgements
{ list here sources of all reused/adapted ideas, code, documentation, and third-party libraries -- include links to the original source as well }
Setting up, getting started
Refer to the guide Setting up and getting started.
Design
Architecture

The Architecture Diagram given above explains the high-level design of the App.
Given below is a quick overview of main components and how they interact with each other.
Main components of the architecture
Main (consisting of classes Main and MainApp) is in charge of the app launch and shut down.
- At app launch, it initializes the other components in the correct sequence, and connects them up with each other.
- At shut down, it shuts down the other components and invokes cleanup methods where necessary.
The bulk of the app's work is done by the following four components:
UI: The UI of the App.Logic: The command executor.Model: Holds the data of the App in memory.Storage: Reads data from, and writes data to, the hard disk.
Commons represents a collection of classes used by multiple other components.
How the architecture components interact with each other
The Sequence Diagram below shows how the components interact with each other for the scenario where the user issues the command delete 1.

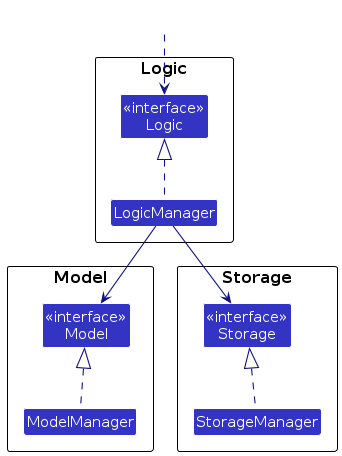
Each of the four main components (also shown in the diagram above),
- defines its API in an
interfacewith the same name as the Component. - implements its functionality using a concrete
{Component Name}Managerclass (which follows the corresponding APIinterfacementioned in the previous point.
For example, the Logic component defines its API in the Logic.java interface and implements its functionality using the LogicManager.java class which follows the Logic interface. Other components interact with a given component through its interface rather than the concrete class (reason: to prevent outside component's being coupled to the implementation of a component), as illustrated in the (partial) class diagram below.
The sections below give more details of each component.
UI component
The API of this component is specified in Ui.java
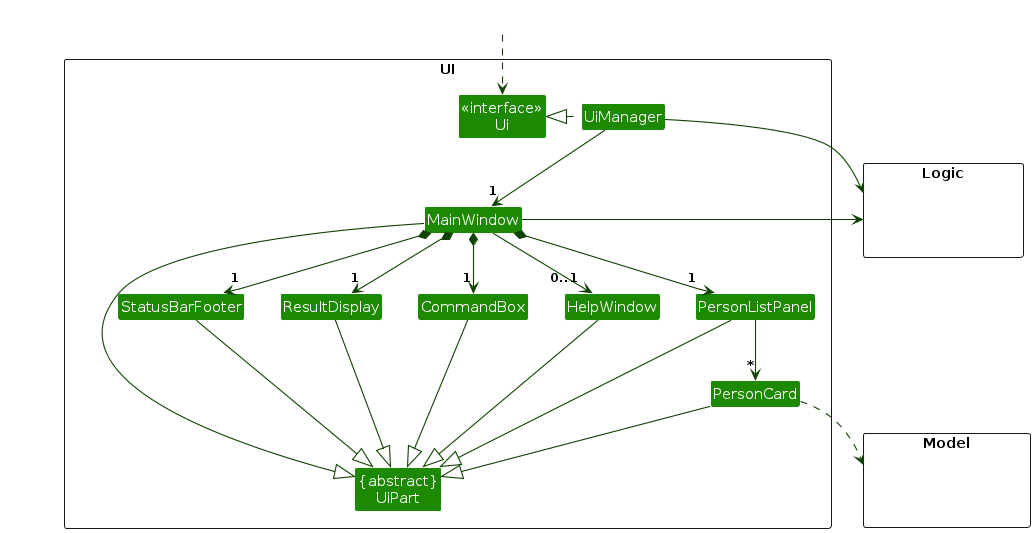
The UI consists of a MainWindow that is made up of parts e.g.CommandBox, ResultDisplay, PersonListPanel, StatusBarFooter etc. All these, including the MainWindow, inherit from the abstract UiPart class which captures the commonalities between classes that represent parts of the visible GUI.
The UI component uses the JavaFx UI framework. The layout of these UI parts are defined in matching .fxml files that are in the src/main/resources/view folder. For example, the layout of the MainWindow is specified in MainWindow.fxml
The UI component,
- executes user commands using the
Logiccomponent. - listens for changes to
Modeldata so that the UI can be updated with the modified data. - keeps a reference to the
Logiccomponent, because theUIrelies on theLogicto execute commands. - depends on some classes in the
Modelcomponent, as it displaysPersonobject residing in theModel.
Logic component
API : Logic.java
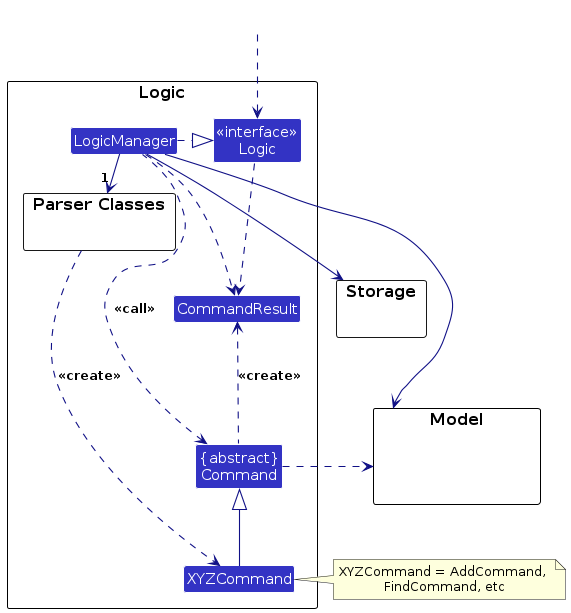
Here's a (partial) class diagram of the Logic component:
The sequence diagram below illustrates the interactions within the Logic component, taking execute("delete 1") API call as an example.
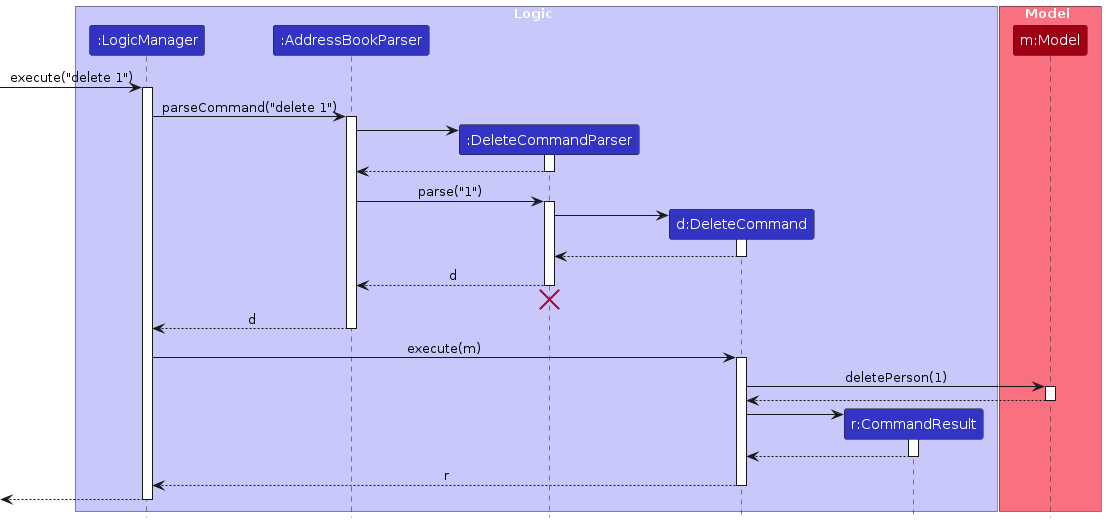
Note: The lifeline for DeleteCommandParser should end at the destroy marker (X) but due to a limitation of PlantUML, the lifeline continues till the end of diagram.
How the Logic component works:
- When
Logicis called upon to execute a command, it is passed to anAddressBookParserobject which in turn creates a parser that matches the command (e.g.,DeleteCommandParser) and uses it to parse the command. - This results in a
Commandobject (more precisely, an object of one of its subclasses e.g.,DeleteCommand) which is executed by theLogicManager. - The command can communicate with the
Modelwhen it is executed (e.g. to delete a person).
Note that although this is shown as a single step in the diagram above (for simplicity), in the code it can take several interactions (between the command object and theModel) to achieve. - The result of the command execution is encapsulated as a
CommandResultobject which is returned back fromLogic.
Here are the other classes in Logic (omitted from the class diagram above) that are used for parsing a user command:
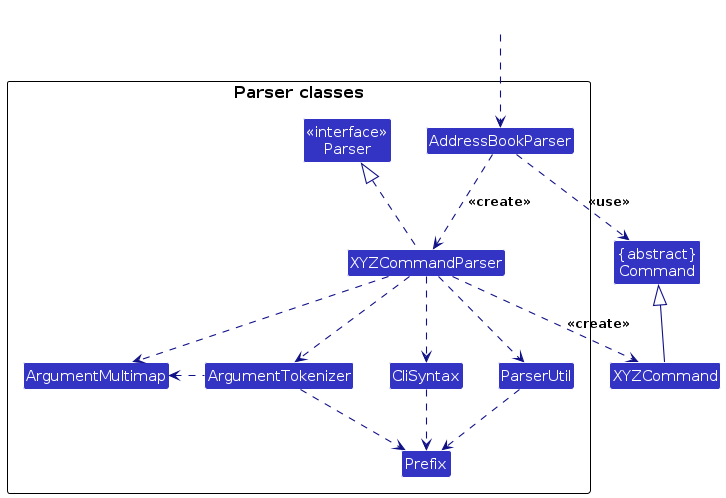
How the parsing works:
- When called upon to parse a user command, the
AddressBookParserclass creates anXYZCommandParser(XYZis a placeholder for the specific command name e.g.,AddCommandParser) which uses the other classes shown above to parse the user command and create aXYZCommandobject (e.g.,AddCommand) which theAddressBookParserreturns back as aCommandobject. - All
XYZCommandParserclasses (e.g.,AddCommandParser,DeleteCommandParser, ...) inherit from theParserinterface so that they can be treated similarly where possible e.g, during testing.
Model component
API : Model.java

The Model component,
- stores the address book data i.e., all
Personobjects (which are contained in aUniquePersonListobject). - stores the currently 'selected'
Personobjects (e.g., results of a search query) as a separate filtered list which is exposed to outsiders as an unmodifiableObservableList<Person>that can be 'observed' e.g. the UI can be bound to this list so that the UI automatically updates when the data in the list change. - stores a
UserPrefobject that represents the user’s preferences. This is exposed to the outside as aReadOnlyUserPrefobjects. - does not depend on any of the other three components (as the
Modelrepresents data entities of the domain, they should make sense on their own without depending on other components)
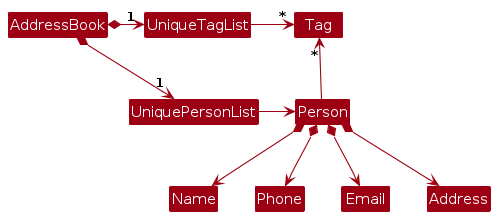
Note: An alternative (arguably, a more OOP) model is given below. It has a Tag list in the AddressBook, which Person references. This allows AddressBook to only require one Tag object per unique tag, instead of each Person needing their own Tag objects.
Storage component
API : Storage.java
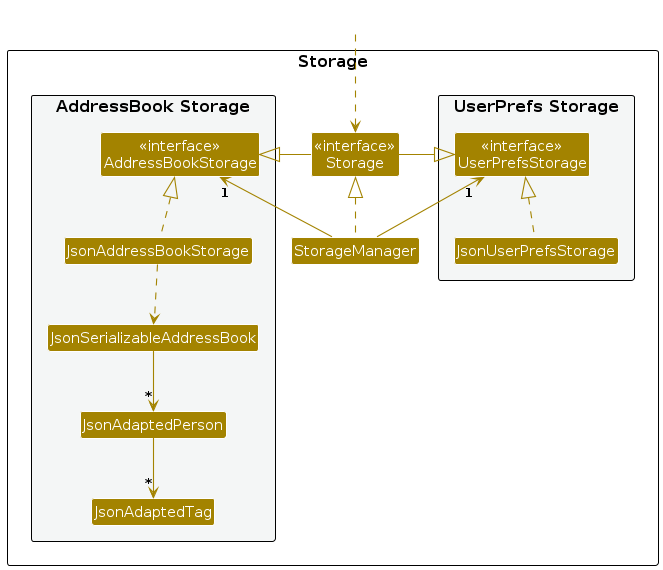
The Storage component,
- can save both address book data and user preference data in JSON format, and read them back into corresponding objects.
- inherits from both
AddressBookStorageandUserPrefStorage, which means it can be treated as either one (if only the functionality of only one is needed). - depends on some classes in the
Modelcomponent (because theStoragecomponent's job is to save/retrieve objects that belong to theModel)
Common classes
Classes used by multiple components are in the seedu.address.commons package.
Implementation
This section describes some noteworthy details on how certain features are implemented.
Add Property feature
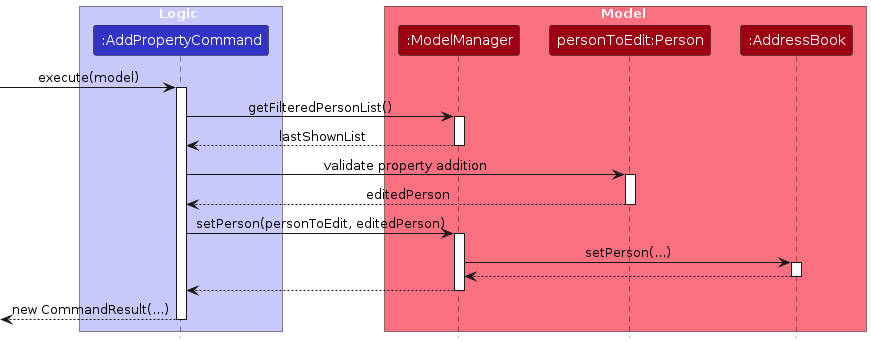
The addProperty feature allows users to add a property to a client identified by the index in the displayed client list.
The AddPropertyCommand is executed through the following flow:
- The command retrieves the currently displayed client list using
Model#getFilteredPersonList(). - The target client is identified using the provided index.
- The command validates whether the property can be added to the target client.
- A new
Personobject is created with the new property added. - The command calls
Model#setPerson(personToEdit, editedPerson)to update the client. ModelManagerupdates the underlyingAddressBook.- The command returns a
CommandResult.
For simplicity, the sequence diagram below focuses on the main interactions and omits lower-level validation details.
The following sequence diagram illustrates the interactions:
Edit Client feature
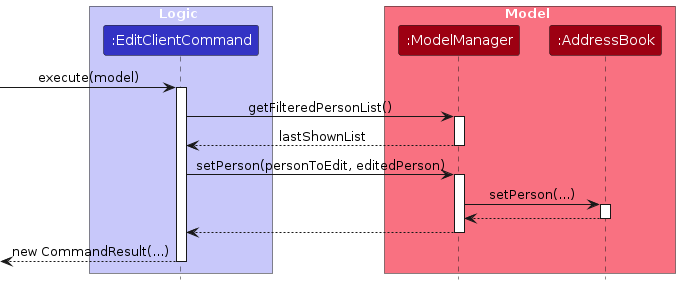
The editClient feature allows users to update the details of an existing client identified by an index in the displayed client list.
The EditClientCommand is executed through the following flow:
- The command retrieves the currently displayed client list using
Model#getFilteredPersonList(). - The target client is identified using the provided index.
- A new
Personobject is created with the updated fields. - The command calls
Model#setPerson(personToEdit, editedPerson)to update the client. ModelManagerupdates the underlyingAddressBook.- The command returns a
CommandResult.
If one or more t/ prefixes are provided, the client’s existing tags are replaced. If t/ is provided without a value, all existing tags are cleared.
For simplicity, the sequence diagram below focuses on the main interactions involved in updating the client and omits lower-level validation details such as index checks and exception handling.
The following sequence diagram illustrates the interactions:
Edit Property feature
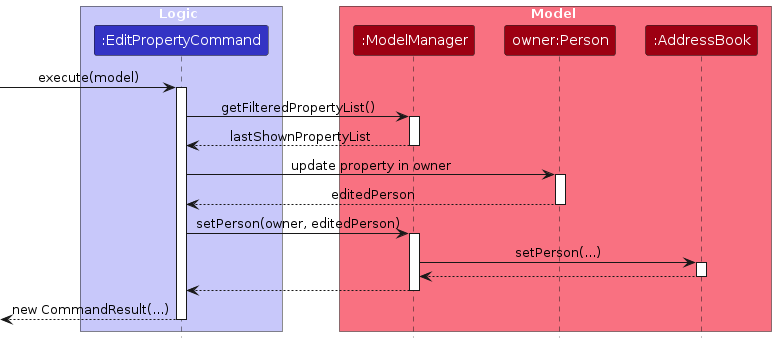
The editProperty feature allows users to edit an existing property identified by its index in the displayed property list.
The EditPropertyCommand is executed through the following flow:
- The command retrieves the currently displayed property list using
Model#getFilteredPropertyList(). - The target property is identified using the provided index.
- The command identifies the client who owns the target property.
- The property is updated through its owner.
- A new
Personobject is created with the updated property. - The command calls
Model#setPerson(owner, editedPerson)to update the client. ModelManagerupdates the underlyingAddressBook.- The command returns a
CommandResult.
Only the specified fields are updated. All other fields remain unchanged.
For simplicity, the sequence diagram below focuses on the main interactions involved in editing a property and omits lower-level validation details such as index checks and exception handling.
The following sequence diagram illustrates the interactions:
Delete Property feature
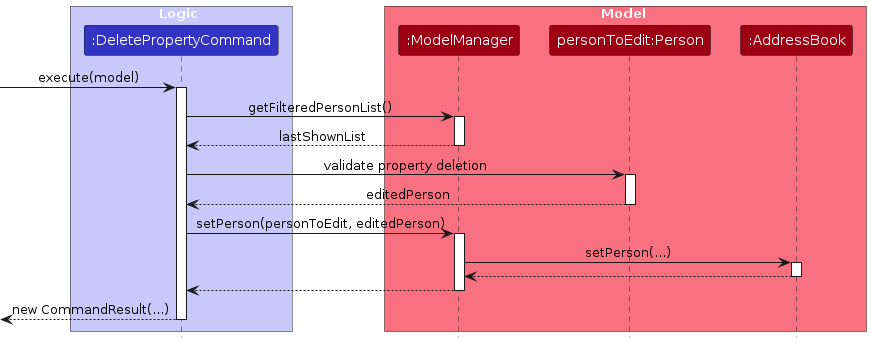
The delete property feature allows users to delete a property identified by the index in the displayed property list. This is done by validating the property deletion and updating the target client in the address book.
The DeletePropertyCommand is executed through the following flow:
- The command retrieves the currently displayed property list by calling
Model#getFilteredPropertyList(). - The target property is identified using the provided index.
- The command validates whether the property can be deleted from the target client.
- If the property deletion is valid,
DeletePropertyCommandcreates an updatedPersonobject without the deleted property. DeletePropertyCommandcallsModel#setPerson(personToEdit, editedPerson).ModelManager#setPerson(...)updates the target client in the underlyingAddressBook.- The command returns a
CommandResultafter the target client has been updated.
For simplicity, the sequence diagram below focuses on the main interactions involved in updating the target client and omits lower-level validation details such as index checks, ownership checks, and exception handling.
The following sequence diagram illustrates the interactions:
Filter Property feature
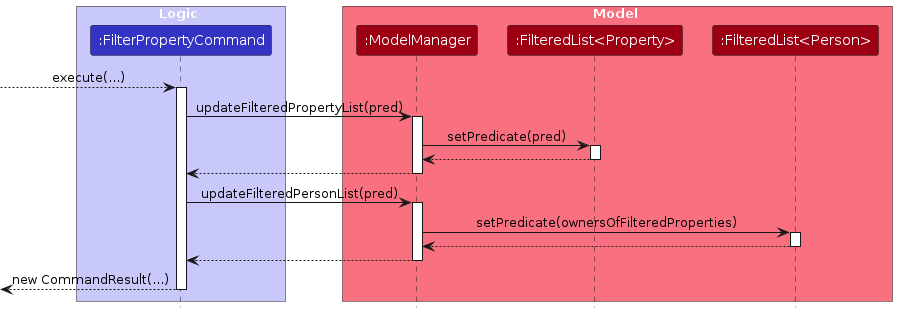
The filter property feature allows users to filter properties by address keywords, price range, and size range, and automatically display the owners of those properties. This is done by updating the predicates on the FilteredList objects.
The FilterPropertyCommand is executed through the following flow:
- The command is executed with a property predicate (
PropertyMatchesFilterPredicate) built from the user input, which may include address keywords, price range, and/or size range. FilterPropertyCommandcallsModel#updateFilteredPropertyList(predicate).ModelManager#updateFilteredPropertyList(...)updates the propertyFilteredListby callingsetPredicate(...).FilterPropertyCommandthen callsModel#updateFilteredPersonList(predicate).ModelManager#updateFilteredPersonList(...)updates the personFilteredListby callingsetPredicate(ownersOfFilteredProperties).- The command returns a
CommandResultafter both filtered lists have been updated.
The following sequence diagram illustrates the interactions:
Design Highlights
- Multi-criteria Filtering: The
PropertyMatchesFilterPredicateimplements thePredicate<Property>interface and supports filtering by address keywords, price range, and size range simultaneously. - Address Keyword Matching: The predicate supports multiple address keywords and performs case-insensitive matching using
StringUtil.containsWordIgnoreCase(). Keywords use OR logic (properties matching any keyword are included). - Numeric Range Filtering: The predicate supports optional minimum and maximum price and size boundaries. A property must fall within all specified ranges to match.
- Cascading Filter: After filtering properties, the command automatically updates the person list to show only those who own matching properties, providing a complete view of relevant data.
- Flexible Criteria: At least one filter criterion (address keywords, price range, or size range) must be provided, but users can combine any of these filters as needed.
[Proposed] Undo/redo feature
Proposed Implementation
The proposed undo/redo mechanism is facilitated by VersionedAddressBook. It extends AddressBook with an undo/redo history, stored internally as an addressBookStateList and currentStatePointer. Additionally, it implements the following operations:
VersionedAddressBook#commit()— Saves the current address book state in its history.VersionedAddressBook#undo()— Restores the previous address book state from its history.VersionedAddressBook#redo()— Restores a previously undone address book state from its history.
These operations are exposed in the Model interface as Model#commitAddressBook(), Model#undoAddressBook() and Model#redoAddressBook() respectively.
Given below is an example usage scenario and how the undo/redo mechanism behaves at each step.
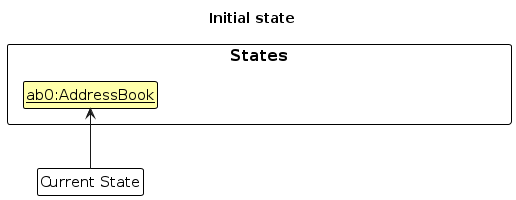
Step 1. The user launches the application for the first time. The VersionedAddressBook will be initialized with the initial address book state, and the currentStatePointer pointing to that single address book state.
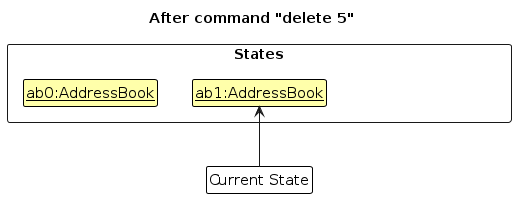
Step 2. The user executes delete 5 command to delete the 5th person in the address book. The delete command calls Model#commitAddressBook(), causing the modified state of the address book after the delete 5 command executes to be saved in the addressBookStateList, and the currentStatePointer is shifted to the newly inserted address book state.
Step 3. The user executes add n/David … to add a new person. The add command also calls Model#commitAddressBook(), causing another modified address book state to be saved into the addressBookStateList.
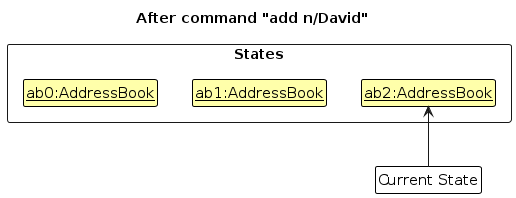
Note: If a command fails its execution, it will not call Model#commitAddressBook(), so the address book state will not be saved into the addressBookStateList.
Step 4. The user now decides that adding the person was a mistake, and decides to undo that action by executing the undo command. The undo command will call Model#undoAddressBook(), which will shift the currentStatePointer once to the left, pointing it to the previous address book state, and restores the address book to that state.
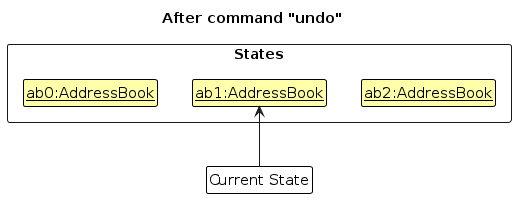
Note: If the currentStatePointer is at index 0, pointing to the initial AddressBook state, then there are no previous AddressBook states to restore. The undo command uses Model#canUndoAddressBook() to check if this is the case. If so, it will return an error to the user rather
than attempting to perform the undo.
The following sequence diagram shows how an undo operation goes through the Logic component:
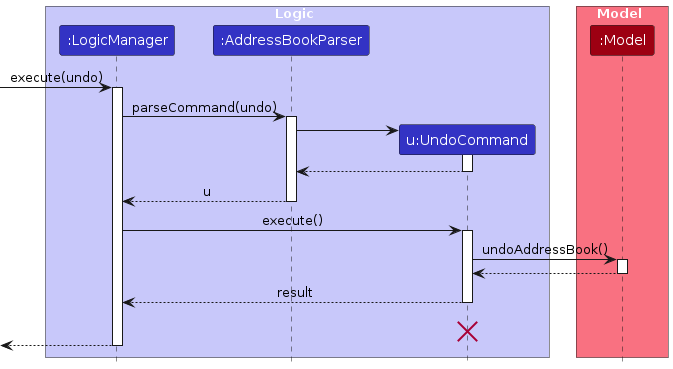
Note: The lifeline for UndoCommand should end at the destroy marker (X) but due to a limitation of PlantUML, the lifeline reaches the end of diagram.
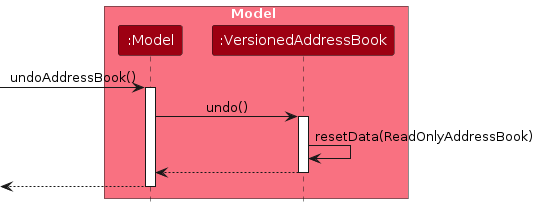
Similarly, how an undo operation goes through the Model component is shown below:
The redo command does the opposite — it calls Model#redoAddressBook(), which shifts the currentStatePointer once to the right, pointing to the previously undone state, and restores the address book to that state.
Note: If the currentStatePointer is at index addressBookStateList.size() - 1, pointing to the latest address book state, then there are no undone AddressBook states to restore. The redo command uses Model#canRedoAddressBook() to check if this is the case. If so, it will return an error to the user rather than attempting to perform the redo.
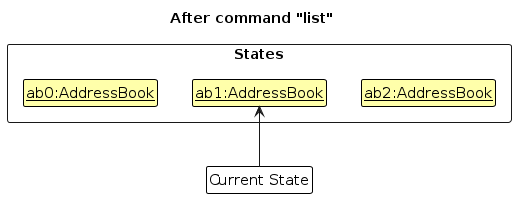
Step 5. The user then decides to execute the command list. Commands that do not modify the address book, such as list, will usually not call Model#commitAddressBook(), Model#undoAddressBook() or Model#redoAddressBook(). Thus, the addressBookStateList remains unchanged.
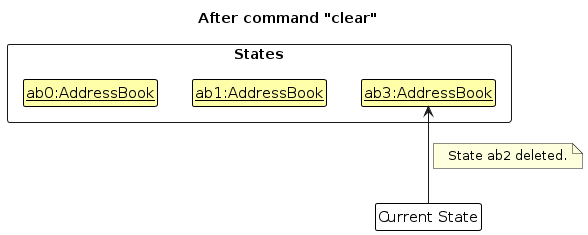
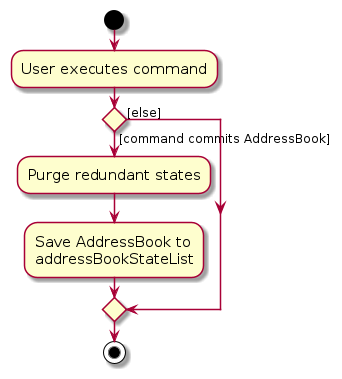
Step 6. The user executes clear, which calls Model#commitAddressBook(). Since the currentStatePointer is not pointing at the end of the addressBookStateList, all address book states after the currentStatePointer will be purged. Reason: It no longer makes sense to redo the add n/David … command. This is the behavior that most modern desktop applications follow.
The following activity diagram summarizes what happens when a user executes a new command:
Design considerations:
Aspect: How undo & redo executes:
Alternative 1 (current choice): Saves the entire address book.
- Pros: Easy to implement.
- Cons: May have performance issues in terms of memory usage.
Alternative 2: Individual command knows how to undo/redo by itself.
- Pros: Will use less memory (e.g. for
delete, just save the person being deleted). - Cons: We must ensure that the implementation of each individual command are correct.
- Pros: Will use less memory (e.g. for
{more aspects and alternatives to be added}
[Proposed] Data archiving
{Explain here how the data archiving feature will be implemented}
Documentation, logging, testing, configuration, dev-ops
Appendix: Requirements
Product scope
Target user profile:
Tech-savvy property agents in Singapore who handle transactions and manage multiple buyers/sellers concurrently. They rely on fast retrieval of key client + property details during time-sensitive interactions (calls, viewings, negotiations) and prefer a keyboard-centric workflow over mouse-heavy CRM tools
Value Proposition:
ClientVault enables Singapore residential property agents to capture, organize, and retrieve client + property details in seconds through a fast, keyboard-driven interface. This reduces the friction of searching across chat logs and spreadsheets when handling daily tasks such as:
- recalling unit details (flat type / size / bedrooms / lease remaining)
- tracking buyer requirements (budget, location, preferred property type)
- quickly matching buyers to suitable seller listings.
User stories
Priorities: High (must have) - * * * *, Medium (nice to have) - * * *, Low (unlikely to have) - * *, Excluded - *
| Priority | As a … | I want to … | So that I can… |
|---|---|---|---|
* * * * | property agent | add a client with contact details and role (buyer/seller) | retrieve them quickly during calls |
* * * * | property agent | view a client’s full profile using a command | reference key details instantly |
* * * * | property agent | remove clients who are no longer buying/selling property | reduce clutter |
* * * * | property agent | add a property listing with details (HDB/Condo, location, size, bedrooms, asking price, lease remaining) | store the listings centrally |
* * * * | property agent | list all active property listings | quickly scan what I have available |
* * * * | property agent | delete property listings that have just been transacted | reduce clutter |
* * * | property agent | find listings that match a buyer’s requirements (budget/type/location) | suggest suitable homes quickly |
* * * | property agent | update buyer requirements (budget, preferred location, type, min bedrooms) | ensure matches remain accurate |
* * * | property agent | update listing details (asking price, status, lease remaining) | ensure information stays current |
* * * | property agent | see a compact summary (type, size, bedrooms, lease, price) | answer quickly without opening multiple fields |
* * * | property agent | use keyboard-friendly commands and aliases | operate quickly without a mouse |
* * | property agent | tag clients/listings (e.g., “urgent”, “hot lead”, “near MRT”) | filter and prioritise easily |
* * | property agent | set follow-up reminders | stay on top of deadlines and next steps |
* * | property agent | record seller viewing time windows | make scheduling smoother |
* | property agent | export a client or listing summary | share it with clients or teammates |
{More to be added}
Use Cases
Use Case 1: Adding a new client followed by new listing under said client
Actor: Residential Property Agent(John)
Goal: Add a new client with his/her property details after first meeting
MSS:
John launches application
John adds new client with his/her relevant details
John reads the system confirmation that the new client has been added
John adds a new property listing under said client
John reads the system confirmation that the new listing has been added under said client
Use case ends
Extensions:
- 2a. Application detects error in John’s entry format
2a1. Application requests for new entry with correct format
2a2. John enters data in correct format
Steps 2a1-2a2 repeats until John uses the proper format.
Use case resumes from step 4
Use Case 2: View Property Information of a Client
Actor: Property Agent
Goal: See all properties listed under a specific client
MSS:
Agent identifies client name
Agent uses the viewProperty feature with the client’s name as the parameter
System retrieves all properties linked to client
Displays the list of properties linked to client(indexed)
User chooses the specific property by index
System displays all relevant information about the specific property
Use Case ends
Extensions:
2a. Client does not exist
2a1. Client does not exist message displayed to user
Use case ends
3a. Client exists but no property listed under client
3a1. No property listed under client message displayed to user
Use case ends
Use Case 3: Delete property listing after successful transaction
Actor: Property agent
Goal: Delete a listing
MSS:
Agent confirms a property has been sold
Agent identifies client name and index
Agent uses the deleteProperty feature with client name, index, address, price and size
System verifies property exists
System confirmation that said property is deleted
Use case ends
Extension:
- 4a. One of the inputs does not match an existing property
4a1. System informs user that specified property does not exist
4a2. Prompts user to try deleting again and give a delete format to follow
4a3. Steps 4a1 to 4a2 repeats as long as user doesn’t input the valid details of an existing property
Use case ends
Non-Functional Requirements
- The application should work on any mainstream OS as long as it has Java 17 or above installed.
- The system should be able to manage at least 1000 client records without noticeable degradation in performance during typical usage.
- A user with above-average typing speed for regular English text should be able to complete most tasks faster using keyboard commands than using the mouse.
- The system should respond to any valid user command within 2 seconds under normal operating conditions.
- Error messages should be clear and guide the user towards corrective action.
- The application should be packaged as a single executable JAR file.
- User data should be stored locally and not transmitted externally without user consent.
Glossary
- Mainstream OS: Windows, macOS, and Linux.
- Executable JAR file: A packaged Java archive file that can be run directly to start the application.
- MSS: Stands for Main Success Scenario, a scenario of the use case which will be considered a successful one.
Appendix: Instructions for manual testing
Given below are instructions to test the app manually.
Note: These instructions only provide a starting point for testers to work on; testers are expected to do more exploratory testing.
Launch and shutdown
Initial launch
- Download the jar file and copy into an empty folder
- Double-click the jar file Expected: Shows the GUI with a set of sample contacts. The window size may not be optimum.
Saving window preferences
- Resize the window to an optimum size. Move the window to a different location. Close the window.
- Re-launch the app by double-clicking the jar file.
Expected: The most recent window size and location is retained.
{ more test cases … }
Deleting a person
Deleting a person while all persons are being shown
- Prerequisites: List all persons using the
listcommand. Multiple persons in the list. - Test case:
delete 1
Expected: First contact is deleted from the list. Details of the deleted contact shown in the status message. Timestamp in the status bar is updated. - Test case:
delete 0
Expected: No person is deleted. Error details shown in the status message. Status bar remains the same. - Other incorrect delete commands to try:
delete,delete x,...(where x is larger than the list size)
Expected: Similar to previous.
- Prerequisites: List all persons using the
{ more test cases … }
Saving data
Dealing with missing/corrupted data files
- {explain how to simulate a missing/corrupted file, and the expected behavior}
{ more test cases … }